Sunday, December 2, 2012

Baby Quilts - Aleks and Owen

I think I've mentioned before that we had quite the 2012 baby boom in our extended families; between my family and my husband's, there were four new arrivals this year!  I hand make a rag quilt for each of the babes as their gift; these are the last two for the 2012 year as we welcome Aleks and Owen to the family.  :) 


(Made from a variety of designers/lines.)


(Made from Riley Blake's "Rush Hour" line.)  

See you again soon! 

Sunday, November 4, 2012

Four cards for you!


This sweet baby card was made for my cousin.  I love the colour combination and the elephant paper; it says "baby" without being pastel or cutesy. 

Supplies:  All supplies listed are from Stampin' Up.
Cardstock:  Close to Cocoa, Crumb Cake, Early Espresso and Lucky Limeade.
Embellishments:  Chocolate Chip scalloped ribbon; So Saffron button; "Congratulations" stamp from Itty Bitty Banners; banner diecut from Bitty Banners Framelits.  The patterned paper is from Stampin' Up as well, but it's retired and I have NO idea what collection it came from.


I made this little treat holder for my husband and loaded it with cinnamon hearts.  I used this tutorial to create a sliding door; that way, the candy can be removed without ripping apart the card.  The "love" tag on the right side is the pull tab for the door.  Clever!  

Supplies:  All supplies listed are from Stampin' Up.
Cardstock:  Whisper White, Cherry Cobbler, and Pool Party.
Stamps:  Sweet Centers (heart and "I <3 and="and" love="love" p="p" tags="tags" tiny="tiny" you="you">
Miscellaneous:  Treat Cups, Circle punch (inside the treat cup), small tag punch (for the "love" tag.) 


I have a soft spot for scallops; this scalloped-front square thank you card is REALLY easy with the help of a die cut. 

Supplies: 
Cardstock:  Wisteria Wonder, Very Vanilla, and Whisper White from Stampin' Up.  Sage green from Bazzil.
Stamps:  Vase from "Button Buddies," Thank You from "Short & Sweet," both by Stampin' Up. 
Embellishments:  Flower buttons by Stampin' Up; scalloped square by Sizzix; banner die cut from Stampin' Up (Bitty Banners Framelits); clear rhinestones (in flower centres) by Recollections.


This last photo really doesn't do the card justice; it is SO cute in person!  I love the shaker frames to add dimension and a little bit of sparkle without a huge mess! 

Supplies: 
Cardstock:  Pool Party and Whisper White by Stampin' Up.
Stamp:  Button Buddies by Stampin' Up.
Ribbon:  Twine from Stampin' Up; chocolate ribbon salvaged from cupcake packaging! 
Embossing folder:  Cuttlebug
Glitter: Dazzling Diamonds by Stampin' Up. 
Ink:  Pool Party and Close To Cocoa by Stampin' Up. 
Transparency from office supply.  


Thanks for stopping in!  I've got a great cupcake shadow box to share - check back soon!  


Father's Day, pt. 2

Well, I've been completely delinquent about posting... sorry about that.  Maybe a certain someone will stop nagging me now (cough, cough, ALLISON!)

Here's the second of the father's day cards I made this year - this was from my son, for my husband.


Supplies:
Cardstock - Baja Breeze, Cherry Cobbler, Not Quite Navy from Stampin' Up.
Paper - October Afternoon (I *think* this is from the Campfire collection.)
Brads - Recollections.
Embossing folder - Sizzix for Stampin' Up.
Tie - yeah, I cut that bad boy by myself!  :)


More to come!  I've got lots of catching up to do!

Wednesday, June 6, 2012

Happy Father's Day - 2012

This is my card for my dad this year - since becoming parents last fall, I now have two cards to make (at least until our son is old enough to wrangle some markers himself!) so there will be another one soon.  :)


Supplies:
Cardstock:  Navy shimmer stock from Bazzil; other cardstock from Stampin' Up (Basic Grey, Lucky Limeade, Whisper White.)
Patterned Paper:  "Alphabet Soup" by Jillibean Soup.
All other supplies (ribbon, twine, button, stamp) from Stampin' Up  (Stamp is from "Delightful Dozen" set.)  

Cheers!  See you again soon! 

Thursday, May 31, 2012

Farm Fresh Quilt - October Afternoon fabric!

The other quilt is done and on it's way to baby Lyla!  This one was made with Farm Fresh by Moda Fabrics (for October Afternoon!)  My new favourite thing about coordinating paper and fabric lines: I can make a matching tag!  


Thanks for stopping by! 

Sunday, May 27, 2012

Forest Friends Quilt

2012 will be the year of the baby boom in our family!  Between my family and my husband's, there will be four new additions to our extended families this year!  So exciting.  As I've mentioned before, I make a rag quilt for each new arrival; this one is for Finnley, born just last night.  The fabric collection is "Forest Friends" by Allegro Fabrics.


Another quilt is in its finishing stages for another family baby, born last week - stay tuned for pics of that one in the coming days!  

Wednesday, April 25, 2012

More CASEd cards!

A few more CASE'd cards to share with you!

The first is a flowerpot card, but my flowerpot when drastically wrong somewhere along the line.  It's supposed to be open at the top and the flowers are connected to the card and it slots into the pot.  Not so much.  Mine was a disaster (twice, if we're being honest) and I ended up giving up and just gluing the whole thing to a card base.  Still pretty cute, if I do say so!  Check out the tutorial here - maybe you can figure it out! 


This "Mr. & Mrs." wedding card is really simple and pretty - a pretty similar knock-off of the original with a different banner, embossing folder, and ribbon.  


These next two cards might be two of my favourites!  They're an adorable take on the classic baby ring stacker and made entirely with scraps.  There are FOUR babies due in our family in 2012, so I'll be going through a few of these!  The original was done by Lisa Lara but unfortunately, I'm unable to link to it - I found it on Pinterest but the source link doesn't work.  Hate it when that happens!


The last one is a CASE from an unknown source; again, I found it on Pinterest and the source link was broken.  I wish I could give credit where credit is due, because this card is GREAT!  


Supplies as follows:  

Flower pot:  Cardstock by Recollections (Grey, Black) and Stampin' Up (Very Vanilla, Cherry Cobbler, Lucky Limeade.)  Patterned Paper by October Afternoon.  Flower Die from Sizzix.  Embossing folder (on the leaves) from Sizzix.  Brads from Recollections.  Scallop border punch from Stampin' Up.

Mr. and Mrs.:  All supplies from Stampin' Up.  Colours used are Very Vanilla (Cardstock) and Crumb Cake (Ink and Ribbon.)

Ring Stackers:  Cardstock from Stampin' Up (Crumb Cake and Early Espresso.)  Patterned paper from various sources.  Woodgrain stamp from Hero Arts.  Bakers Twine from The Twinery.  Stamp, rub-on, and tag punch from Stampin' Up.

S(ick):  Patterned paper from unknown source.  Border punch by Fiskars.  All other supplies from Stampin' Up (colours used are Crumb Cake, Cherry Cobbler, Whisper White, and Pool Party.)  


See you next time! 

Sunday, April 15, 2012

Autumn Sweater Yarn Wreath

I set out to create a spring-y yarn wreath for our front door... I love this wreath, but totally failed at the "spring-y" part!  It reminds me of a cosy autumn sweater.


Hope you're enjoying your weekend! 

Monday, April 2, 2012

CASE, CASE, CASE!

I'm short on inspiration and time these days, so most of my crafting has been CASEing!  I've found some great creations online and went at them myself. 

This first card was cased from THIS PROJECT by Mary.  Hers is actually a bookmark, but mine is glued flat and just a card.  I changed a number of elements, obviously, but I love the final look!  


This second card was inspired by Jen Del Muro's project seen HERE.  I used the five current Stampin' Up In Colours on this; I love that they all go together so well! 


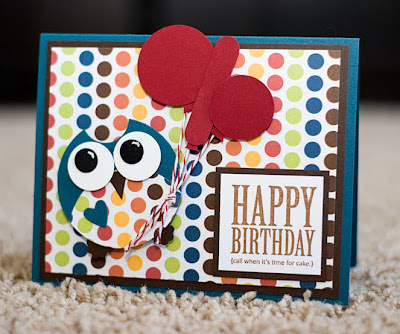
And the last card is an original layout, but I cased that little owl from Heather Summers' blog.  She has a great tutorial on how to make them!


Supplies list:

"Always" card:  All supplies from Stampin' Up.  Cardstock (Cherry Cobbler and Crumb Cake).   Polka-dot scalloped ribbon in Basic Black.  Neutrals buttons.  "Always" stamp from Always Elegant set.  Flower die from Sizzix/Stampin' Up.  Basic Black brad.  Modern Label punch.  First Edition DSP.

"A Million and One Thanks" card:  Cardstock from Bazzil (textured white and black) and Stampin' Up (Whisper White.)  Coloured cardstock from the 2011-2013 In-Colours by Stampin' Up.  Buttons from Michael's.  Embossing folder from Sizzix, used with the Cuttlebug.  Stamp from Technique Tuesday.  Embossed hearts from Sizzix/Stampin' Up.

"Happy Birthday" card:  Cardstock from Stampin' Up (Not Quite Navy, Early Espresso, Cherry Cobbler, Whisper White, Basic Black.)  Patterned Paper from "Play" by American Crafts.  Twine (Cherry Cobbler) from Stampin' Up.  Sentiment from Stampin' Up ("Afterthoughts" set.)  Various punches from Stampin' Up (Circles, Word Window, Heart, Itty Bitty.)  


Thanks for coming by - see you next time! 

Monday, March 12, 2012

Hello, Love!

Finally finished James' birth layout.


In that moment, my life changed instantaneously and my heart grew exponentially.  It was the first time I saw your face, yet I felt I'd known you forever.  In my sleep-deprived, heavily-drugged state, the first words out of my mouth were 'Hello, Love!'  You were here, and you were mine.  Perfection.

Supplies used:
Cardstock:  Bazzil (12x12 base) and Stampin' Up (Not Quite Navy, Very Vanilla, Cherry Cobbler.)
Printed papers:  "Lil' Man" collection from Cosmo Cricket.
Ink:  Stampin' Up (Sahara Sand.)
Chipboard Letters:  Thickers by American Crafts.
Chipboard Accents: Cosmo Cricket "Lil' Man" collection.
Font:  "Daniel" from dafont.com.

Sunday, March 4, 2012

LOVE - Valentine's Day 2012


Supplies used:
Cardstock:  Real Red, Pool Party cardstock from Stampin' Up; French Vanilla from Bazzil.
Twine:  "Marachino" from The Twinery.
Clothespins:  Craft supply.
Die cut hearts:  Die from Cuttlebug.
Letters:  Cut with Slice Machine and Basics Elements cartridge.
Date tag:  Jillibean Soup
Thread (on stitched circles): Guterman #601
Ribbon:  Stampin' Up
Ink:  Crumb Cake from Stampin' Up.

Saturday, February 25, 2012

Dresser Card - Baby Girl

I saw this adorable baby dresser card online and wanted to duplicate it for my girlfriend Joss.  She is expecting her little girl next month and her shower is tomorrow; I can't wait to give it to her!


Supplies needed:
One 12x12 sheet of cardstock
Brown ink 
Sponge
Brads
Hole puncher
Scraps of patterned paper
Onesie stamp
Pop-dots and regular adhesive
Metal hanger (mine is from Tim Holtz)

Instructions:
1.  Cut your 12x12 cardstock into five pieces:
-One piece 4.5x12" (the card base)
-One piece 1x5" (the top wood trim)
-Three pieces 1.25x4.25" (the drawers)

2.  Score your card base (the biggest piece) and fold.  

3.  Sponge all of the edges with brown ink.  This is subtle but gives the dresser some dimension.  

4. Punch holes in your drawers for the brads.  I measured and marked with a pencil on the backside of one drawer so they'd be even, then punched through all three layers at the same time.

5. Apply brads to drawers.  Please note there is NO brad under the onesie.

6.  Using pop-dots, adhere the wood trim to the top of the card.  Then line up the drawers and adhere with pop dots in the remaining space. 

7.  Stamp a onesie and cut out.  Using sticky strip or other strong adhesive, adhere to hanger.  Hook the top of the hanger over a drawer and adhere using pop-dots.

8.  Make a blanket using a scrap of paper.  I used patterned paper, cut a fringe, and embossed it with a small dot pattern.  Fold the top edge and tuck behind the top of the bottom drawer.  Adhere front with a pop-dot.

Time consuming, yes - I'm not going to lie, this took over an hour!  But for a good friend at a very exciting time in her life, it's WELL worth it.  :) 

Enjoy! 

Thursday, February 23, 2012

Birthday Balloon Wreath

Another easy, quick project with beautiful results - my favourite kind!

Here are the supplies needed:
-One pool noodle (or styrofoam wreath form)
-Duct tape (if using pool noodle)
-Balloons.  I used 350 full-size balloons.
-Floral pins.  I used 360 of these (a few extra for the joint on the wreath.)
-Ribbon

The pool noodle is used in place of a wreath form.  Honestly, wreath forms are almost always the most expensive part of my projects so I've been looking for an alternative.  Pool noodles are $2 at the dollar store - perfect!

Instructions:

1.  Cut your pool noodle to the desired length.  I cut a little over a foot off of mine and left myself with about 4' of noodle.  You can just cut it with a big kitchen knife - if you've got good knives, this is easier than you'd think!


2.  Bend your noodle into a circle and secure the ends with floral pins (putting one side of the pin on each side of the cut) and duct tape.  Nothing else will be strong enough to hold it.  Ta-da!  You have a wreath form with a $2 price tag (and a couple of strips of duct tape.)


3.  Feed a floral pin through the middle of your balloon.


4.  Stick the pin into the form.

5.  Repeat.


6. ...and keep repeating.


7.  And keep repeating.  This is what the wreath looks like with 100 balloons:


8.  Keep going.  This is 200 balloons:


9.  Keep going until you're *almost* finished.  Leave a gap just wider than the width of your ribbon.


10.  Feed the ribbon through the gap and tie a knot or bow at the top.  Continue pinning balloons over top of the ribbon to cover and fill the gap.


You're done!  Easy as that!

The cost?
Pool noodle - $2
Spool of ribbon - $3.50
Balloons (5 packages of 72 balloons at $5 each) - $25
Floral pins (4 packages of 100 at $1.44 each) - $5.76
Incidentals - some duct tape.

TOTAL:  $36.26.  Not too shabby!

Enjoy and happy crafting!

Sunday, February 19, 2012

Peacock Monogram Wreath

Another easy wreath project!  Once it warms up a bit here (I'm thinking Tuesday...) I'll finally be able to mount a hook on our front door so I can start hanging these!


Supplies used: 
-Extruded wreath from Michael's ($3.50 w/ a coupon)
-Peacock feathers from Dollarama ($2 for a three-pack)
-Monogram from Michael's ($2)
-Brown yarn from Michaels ($4)
-Paint from Michael's ($3)
-Shimmery ribbon from Michael's ($6)

Total:  $20.50, plus I still have a bottle of paint, most of a spool of ribbon, and half-a-ball of yarn left over! 

Instructions are easy: 
1. Using hot glue, attach one end of yarn to the back of the wreath form.
2. Wrap yarn around wreath, pushing together to cover gaps.  Secure end with hot glue.
3.  Cut peacock feathers where desired, arrange, and adhere with hot glue.
4.  Paint monogram letter.  Adhere to wreath with hot glue.
5.  Attach ribbon in a slip-knot.

Enjoy!


Thursday, February 16, 2012

52 Things - A Valentine's Gift

Pinterest has totally changed the way I craft.  I had been getting so bored with cards, so I moved into scrapbooking, but honestly, that wasn't thrilling me too much.  There are so many FABULOUS ideas on Pinterest, though, that I'm seeing things in a whole new light!

This was another project I decided to tackle as a v-day gift for my husband; it's a repurposed deck of cards, made into a personalized mini-scrapbook titled "52 Things I Love About You."  Honestly, the hardest part was thinking of the 52 things!

This was very easy to assemble - Start with one card (I used a Joker for the cover so there would be 52 cards inside) and punch two holes in it.  Using that card as a template, line up the other cards and punch them all.  Attach eyelets to the front and back cover, then string all of the cards onto binder rings.  Decorate as you wish and you're done!


The best part of this project?  I didn't have to cut a single new sheet of paper - this was made entirely from scraps!  I keep all of my scraps in a box for small projects, and this was a perfect way to use up a LOT of them.  Gotta love that!  

There were a lot of supplies used in this, but I'll share the ones shown (as much as I remember!)

Cover:  Numbers from American Crafts, letters from Cosmo Cricket.
Sushi:  Stamps from Cornish Heritage Farms (one of the Kim Hughes sets.)
Chemistry:  Patterned paper from Jillibean Soup.
Suit: Pinstripe paper from Costco value pack, checkered paper from October Afternoon "Farm Fresh."  Tie was cut by hand.
Technology Problems: Paper from October Afternoon "Modern Homemaker," amplifier from Imaginisce.
Don't Mind when I Don't Cook:  Paper from October Afternoon "Farm Fresh."
Dog Whisperer:  Paper from Basic Grey "Max and Whiskers."
Handy:  Stamp from Stampin' Up "Every Little Bit" set; woodgrain background stamp from Hero Arts.
Ridiculous Ideas:  I wish I knew where this sock monkey paper was from so I could buy more, but I can't remember!  I've had it for years...
House:  Paper from October Afternoon "Weathervane."

Enjoy and hope you had a wonderful valentine's day!

Follow me on Pinterest:  http://www.pinterest.com/slane2

Saturday, January 14, 2012

Christmas Monogram Wreath

Another Pinterest-inspired project!  This was SO time consuming and labour intensive.  I've easily put 12-15 hours into this wreath, but I'm really happy with how it turned out.  This will be for our front door next christmas.  It seems counterintuitive to make an xmas project in January, but at least I was able to buy a lot of the supplies for 75-90% off!


There are WAY too many things here to list all of the supplies individually, but I'll break down some of the parts of it:

Wreath frame:  Clearance at the grocery store.  $0.84!  It had a felt bird on it, which I took off, took apart, and used for scraps.  
Monogram L:  Michael's.  MDF painted with Martha Stewart glitter paint in Antique Silver.
Ribbon:  There's SO much ribbon on this, I don't even know where to begin!  Ribbons predominantly from Michael's basic collection, Walmart basic collection, American Crafts, and Stampin' Up with some miscellaneous in the mix as well. 
Balls:  Foam glitter balls from Michael's; ornament balls (red and silver) from the grocery store.
Sprigs:  Green branch and red sequin sprigs from Michael's.  Red/green star wire garland from Walmart.
Felt:  Leftover scraps from my Grinch quilt (see a few posts back.)
Other: Jingle bells from Walmart; buttons from Fancy Pants, Basic Grey, and American Crafts; star picks by Maya Road; miniature cookie cutters from craft supply; hologram stars from Walmart; snowflakes from Stampin' Up; vinyl brads from Hobby Lobby.

Wednesday, January 11, 2012

Yarn and Felt Wreath

This isn't a paper craft, but let's call it like it is - a lot of the time, crafters are crafters!

This is inspired by another idea I found on Pinterest.  I wanted a wintery colour scheme and I love how this turned out!


Wreath form:  $6.99
Yarn:  $3.49
Felt (four sheets @ $0.49 each): $1.96
Other supplies:  Hot glue

This was dead easy and really quick to make!  My son has been napping for two hours, and in that time, I've put dinner in the Crock Pot, made this wreath start to finish, photographed it, and done this blog post.  So, obviously, it doesn't take very long!  I see more of these in my future!

Sunday, January 8, 2012

Card Binder

Another great idea I saw on Pinterest that I thought I'd put into use, since I've got a huge stash of cards sitting in boxes.  I'll do this with our wedding cards, too, but I started with the cards James received when he was born.  Each card was hole-punched in the corner with my Crop-A-Dial and I created a cover (front and back, but the back is just plain cardstock) and bound them together with a binder ring.  Super easy, really cheap (the only thing purchased was the binder ring - I got a 10-pack for $1 at the dollar store!) and a great, usable way to save keepsake cards.


Supplies:

Cardstock by Stampin' Up (Not Quite Navy, Baja Breeze, Crumb Cake)
Patterned Paper by October Afternoon (Campfire collection)
Diecut tag from Sizzix
Diecut leaves from Cuttlebug
Leather letters from American Crafts (Thickers)
Wood veneer sheets from Creative Imaginations
Green letter stickers from October Afternoon
Button from Stampin' Up
Bakers Twine from The Twinery
Ribbon from American Crafts
Tools used:  Crop-A-Dial, Cuttlebug.
Other:  Binder ring (dollar store.)

James' newborn layout

I'm really thrilled with how this page turned out; it's simple, clean, boyish, and beautiful!


Supplies as follows:
Cardstock from Bazzil and Recollections
Patterned Paper from American Crafts ("The Goods" collection)
Diecut letters ("James") cut with Slice by Making Memories, Bon Appetit card
Buttons from Stampin' Up
Font (on stats) "Antipasto" from dafont.com

Sunday, January 1, 2012

Organized Chaos... my ribbon storage

Ribbon might be one of the most difficult things to store for any crafter.  I have SO MUCH RIBBON it's bordering on hoarding, and I've never kept it on the spools because it's just too bulky.  Up until this past week, my ribbon has been in Ziploc bags, sorted by colour families; it was a disaster.  I couldn't see what was in there since they were so jammed full, and all of the strands were tangled and impossible to get out.  Often times I couldn't find an end, so I'd just cut a piece out of the middle.  What a mess.

I saw this idea using clothespins on Pinterest and thought it might just work for me.  Santa took the hint and put 100 wooden clothespins in my christmas stocking this year; sadly enough, that STILL wasn't enough so I had to make an extra trip to the dollar store to finish up.

Here's what my ribbon storage looks like now:


The first drawer is SUPREME organization, especially for me... I'm not known for being an organized person.  The left column is mostly-full spools of Stampin' Up (at 10 yards per spool, they're too big to unwind!) and twine (hemp and linen thread from Stampin' Up and lots and lots of baker's twine from My Mind's Eye, The Twinery, and Martha Stewart.)  The two middle columns are unopened (oh, the shame!  I just bought MORE!) spools from American Crafts; regular grosgrain and polkadot grosgrain.)  The right column is mostly striped grosgrain from Stampin' Up and a few assorted wide ribbons at the back.  The cardboard tags are punched from a Sizzix die from scrap cardboard in our recycling bin.  Reusing at it's finest!  

The second drawer shows the clothespin method.  It's still a bit of a mess, admittedly; I'm at peace with that.  Each piece of ribbon is visible, though, and nothing gets tangled up.  Hopefully this will allow me to use things more effectively!