Showing posts with label cards. Show all posts

Wednesday, April 25, 2012

More CASEd cards!

A few more CASE'd cards to share with you!

The first is a flowerpot card, but my flowerpot when drastically wrong somewhere along the line.  It's supposed to be open at the top and the flowers are connected to the card and it slots into the pot.  Not so much.  Mine was a disaster (twice, if we're being honest) and I ended up giving up and just gluing the whole thing to a card base.  Still pretty cute, if I do say so!  Check out the tutorial here - maybe you can figure it out! 


This "Mr. & Mrs." wedding card is really simple and pretty - a pretty similar knock-off of the original with a different banner, embossing folder, and ribbon.  


These next two cards might be two of my favourites!  They're an adorable take on the classic baby ring stacker and made entirely with scraps.  There are FOUR babies due in our family in 2012, so I'll be going through a few of these!  The original was done by Lisa Lara but unfortunately, I'm unable to link to it - I found it on Pinterest but the source link doesn't work.  Hate it when that happens!


The last one is a CASE from an unknown source; again, I found it on Pinterest and the source link was broken.  I wish I could give credit where credit is due, because this card is GREAT!  


Supplies as follows:  

Flower pot:  Cardstock by Recollections (Grey, Black) and Stampin' Up (Very Vanilla, Cherry Cobbler, Lucky Limeade.)  Patterned Paper by October Afternoon.  Flower Die from Sizzix.  Embossing folder (on the leaves) from Sizzix.  Brads from Recollections.  Scallop border punch from Stampin' Up.

Mr. and Mrs.:  All supplies from Stampin' Up.  Colours used are Very Vanilla (Cardstock) and Crumb Cake (Ink and Ribbon.)

Ring Stackers:  Cardstock from Stampin' Up (Crumb Cake and Early Espresso.)  Patterned paper from various sources.  Woodgrain stamp from Hero Arts.  Bakers Twine from The Twinery.  Stamp, rub-on, and tag punch from Stampin' Up.

S(ick):  Patterned paper from unknown source.  Border punch by Fiskars.  All other supplies from Stampin' Up (colours used are Crumb Cake, Cherry Cobbler, Whisper White, and Pool Party.)  


See you next time! 

Monday, April 2, 2012

CASE, CASE, CASE!

I'm short on inspiration and time these days, so most of my crafting has been CASEing!  I've found some great creations online and went at them myself. 

This first card was cased from THIS PROJECT by Mary.  Hers is actually a bookmark, but mine is glued flat and just a card.  I changed a number of elements, obviously, but I love the final look!  


This second card was inspired by Jen Del Muro's project seen HERE.  I used the five current Stampin' Up In Colours on this; I love that they all go together so well! 


And the last card is an original layout, but I cased that little owl from Heather Summers' blog.  She has a great tutorial on how to make them!


Supplies list:

"Always" card:  All supplies from Stampin' Up.  Cardstock (Cherry Cobbler and Crumb Cake).   Polka-dot scalloped ribbon in Basic Black.  Neutrals buttons.  "Always" stamp from Always Elegant set.  Flower die from Sizzix/Stampin' Up.  Basic Black brad.  Modern Label punch.  First Edition DSP.

"A Million and One Thanks" card:  Cardstock from Bazzil (textured white and black) and Stampin' Up (Whisper White.)  Coloured cardstock from the 2011-2013 In-Colours by Stampin' Up.  Buttons from Michael's.  Embossing folder from Sizzix, used with the Cuttlebug.  Stamp from Technique Tuesday.  Embossed hearts from Sizzix/Stampin' Up.

"Happy Birthday" card:  Cardstock from Stampin' Up (Not Quite Navy, Early Espresso, Cherry Cobbler, Whisper White, Basic Black.)  Patterned Paper from "Play" by American Crafts.  Twine (Cherry Cobbler) from Stampin' Up.  Sentiment from Stampin' Up ("Afterthoughts" set.)  Various punches from Stampin' Up (Circles, Word Window, Heart, Itty Bitty.)  


Thanks for coming by - see you next time! 

Saturday, February 25, 2012

Dresser Card - Baby Girl

I saw this adorable baby dresser card online and wanted to duplicate it for my girlfriend Joss.  She is expecting her little girl next month and her shower is tomorrow; I can't wait to give it to her!


Supplies needed:
One 12x12 sheet of cardstock
Brown ink 
Sponge
Brads
Hole puncher
Scraps of patterned paper
Onesie stamp
Pop-dots and regular adhesive
Metal hanger (mine is from Tim Holtz)

Instructions:
1.  Cut your 12x12 cardstock into five pieces:
-One piece 4.5x12" (the card base)
-One piece 1x5" (the top wood trim)
-Three pieces 1.25x4.25" (the drawers)

2.  Score your card base (the biggest piece) and fold.  

3.  Sponge all of the edges with brown ink.  This is subtle but gives the dresser some dimension.  

4. Punch holes in your drawers for the brads.  I measured and marked with a pencil on the backside of one drawer so they'd be even, then punched through all three layers at the same time.

5. Apply brads to drawers.  Please note there is NO brad under the onesie.

6.  Using pop-dots, adhere the wood trim to the top of the card.  Then line up the drawers and adhere with pop dots in the remaining space. 

7.  Stamp a onesie and cut out.  Using sticky strip or other strong adhesive, adhere to hanger.  Hook the top of the hanger over a drawer and adhere using pop-dots.

8.  Make a blanket using a scrap of paper.  I used patterned paper, cut a fringe, and embossed it with a small dot pattern.  Fold the top edge and tuck behind the top of the bottom drawer.  Adhere front with a pop-dot.

Time consuming, yes - I'm not going to lie, this took over an hour!  But for a good friend at a very exciting time in her life, it's WELL worth it.  :) 

Enjoy! 

Sunday, January 8, 2012

Card Binder

Another great idea I saw on Pinterest that I thought I'd put into use, since I've got a huge stash of cards sitting in boxes.  I'll do this with our wedding cards, too, but I started with the cards James received when he was born.  Each card was hole-punched in the corner with my Crop-A-Dial and I created a cover (front and back, but the back is just plain cardstock) and bound them together with a binder ring.  Super easy, really cheap (the only thing purchased was the binder ring - I got a 10-pack for $1 at the dollar store!) and a great, usable way to save keepsake cards.


Supplies:

Cardstock by Stampin' Up (Not Quite Navy, Baja Breeze, Crumb Cake)
Patterned Paper by October Afternoon (Campfire collection)
Diecut tag from Sizzix
Diecut leaves from Cuttlebug
Leather letters from American Crafts (Thickers)
Wood veneer sheets from Creative Imaginations
Green letter stickers from October Afternoon
Button from Stampin' Up
Bakers Twine from The Twinery
Ribbon from American Crafts
Tools used:  Crop-A-Dial, Cuttlebug.
Other:  Binder ring (dollar store.)

Monday, April 25, 2011

More cards, of course!

Here's a mishmash of everything else I've been up to in the last little while!


Let me know if you have any questions about supplies or techniques! 

Sunday, April 24, 2011

Wedding Card

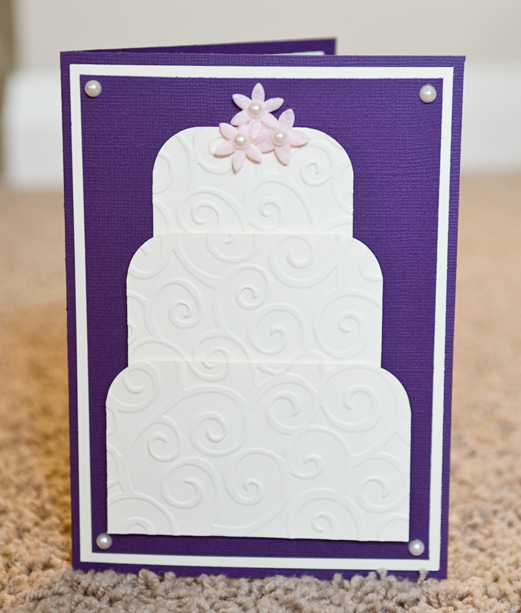
This design is one of my favourites; it's so simple to make but looks so beautiful and elegant!  I try to match the couple's wedding colours as best as I can for a customized look.  I've made a few of these in the last couple of years and they're always a hit with the bride and groom!


This particular card is for Steve's cousin, who is getting married in May.  Her invitation was eggplant and vanilla, so that was mirrored in the design.   The cake is super easy to make; just three rectangles, round the top corners, and emboss with your favourite embossing folder.  Layer with pop dots (the bottom layer is the highest) and tuck each layer under the one below it.  Couldn't be easier! 

I also stamped the inside of this card; I almost never put anything on the inside of my cards, but I just love this sentiment and really wanted to use it.  The ink is eggplant as well. 


Most supplies are from Stampin' Up:  Very Vanilla cardstock, stamped sentiment, ticket punch (inside corners) and felt flowers.  The purple cardstock is from Bazzil, the pearls are from Recollections, the corner rounder (on the cake) is from Marvy Uchida and the embossing folder is from Cuttlebug.  


Monday, November 15, 2010

Christmas Cards

Just a sampling of the Christmas cards I've been making; I'm preparing for a late-November craft sale and am hoping to sell a few of these!


Friday, October 29, 2010

More cards!

Two more fun cards to share!


Friday, October 22, 2010

All aboard the Copic bandwagon!

I finally bit the bullet a few months ago and bought Copics - and they're pretty fantastic,  I have to say!  I don't use them frequently, but when I do, I'm pretty darn pleased with the results.   Here's a simple card and a couple of bookmarks I made recently using them.


Sunday, February 21, 2010

Button Bits

Last week, I was able to get my hands on Everyday Button Bits from Papertrey Ink via a kind soul on SCS.  The Papertrey website was sold out, not to mention that shipping to Canada was $19.60 (on a $27 set!)

I had a chance to play with it this weekend and I'm quite pleased with it... the button cards are super cute and it's a good way to use up some of my stash. What sewer doesn't have a stash of random, mismatched buttons?


This first card is the large chickadee from the set. Super cute, eh? The cardstock (blue and yellow) is Bazzil and (white) Recollections; patterned paper from American Crafts' Craft Fair collection; button from Elan; ink from Stampin' Up; ribbon leftover from cupcake packaging; stamps from Papertrey Ink.


This one was made for CS268 on Splitcoaststampers.com. I loved the simple, clean lines of the sketch. My intention was to make a monkey card but I deviated from that and I'm glad I did; the reverse of all these papers is monkeys and bananas! I think it turned out nicely and is fairly gender neutral.  Cardstock from Stampin' Up; patterned paper from Recollections; ink from Stampin' Up; buttons from Elan and craft supply; stamps from Papertrey Ink. 

Have a great day! 

Tuesday, January 5, 2010

More "Stash" Cards

A few more cards made using some of my stash. I have a LOT of patterned paper so it feels nice to start putting a dent into it.


The first two cards were made with stamps from the Kim Hughes Collection by Cornish Heritage Farms. I love the little germs! On the first card, the patterned paper is from "Backyard" by American Crafts. The ribbon on both cards is American Crafts. The dry embossing on the second card is the Candycane folder by Cuttlebug.


This card was made with my stash of "The Menagerie" from Dream Street Papers.  I put some diamond glaze on the heart to give it some depth and shine.


I love this card! Super cute for a little guy, I think.  The stamps are from Recollections and the patterned paper is from Scenic Route.  The image was coloured with RoseArt pencil crayons.

Happy Tuesday!

Sunday, January 3, 2010

American Crafts "Craft Fair" paper

Someone on SCS mentioned a new year's resolution that I thought was neat - make 100 cards or layouts before buying ANY more product. Great idea, I though... but let's be realistic. I know that as soon as Cosmo Cricket or October Afternoon comes out with a new line, it doesn't matter if I have 1 or 1000 cards made; I need to buy that line.

That said, though, it was a great push to at least START to use my stash... even if I just make an effort to use more product than I buy, it's moving in the right direction.

I started into my stash today with the Craft Fair line of paper by American Crafts. I picked up a few boxes of AC paper on clearance at Michael's a while ago- 60 sheets for $10 or $15, how can you go wrong?! But that's a lot of paper... so I better get a move on.

All paper on these cards is by American Crafts "Craft Fair." Other supplies listed.


Cardstock and ink by Stampin' Up; rub-on by October Afternoon.


Cardstock by Bazzil; ink by Stampin' Up; punches by EK Success.


Cardstock and ink by Stampin' UP, rub-on by Dream Street.


Cardstock and ink by Stampin' Up; letter stickers by American Crafts; safety pin (on "t") by Making Memories.

I hope this inspires you to use some of your stash! Leave a comment and let me know what you're doing to put a dent in all of the product that we all tend to accumulate.

Friday, January 1, 2010

More cards!

A few more cards... mom and I continued our marathon today!


Thursday, December 31, 2009

Card making day

My mom came over today to get a jumpstart on next year's Christmas cards - she's ahead of the game, eh? I was helping her out for a bit. I made this reindeer card and ended up keeping it for myself, it was so cute! I made two more for my mom, but this one is MINE!


This one is made from Stampin' Up kraft cardstock, Bazzil offwhite cardstock, October Afternoon patterned papers (from the Very Merry and Good Cheer collections), Cornish Heritage Farms stamps (christmas collection by Kim Hughes), American Crafts ribbon, and a chipboard tree. Rudolph's nose was embossed with Stampendous red glitter embossing powder.


This card was heavily inspired by a card I found on SplitCoastStampers.com. The cardstock is Recollections and Bazzil, the patterned paper is October Afternoon (Report Card and Hometown collections), the stamps are from Cornish Heritage Farms (Kim Hughes collection) and the ribbon is Dots & Dashes.  The pie was coloured in with RoseArt pencil crayons.

Happy new year! Have a safe and enjoyable evening ringing in 2010. See you next year!

Thursday, December 24, 2009

Merry Christmas!

Merry Christmas from Scrap Yard Cards! Here are a few of the cards I'll be giving to family today and tomorrow.


Supplies: Shimmer cardstock by Bazzil; crinkle paper from an unknown source; patterned paper by Heidi Grace; felt snowflake by Hero Arts; bling brad by Bazzil; corner rounder by Marvy Uchida; dry embossing Snowflakes folder by Cuttlebug. 


Supplies: Cardstock by Bazzil; snowflake diecuts by Cricut; dry embossing Snowflakes folder by Cuttlebug; silver "let it snow" rub-on by American Crafts; jewels by Hero Arts.


Supplies: Cardstock by Bazzil; patterned paper by Bo Bunny (polka dot only) and American Crafts (from the Merrymint Collection); stamp by American Crafts; ribbon from craft supply; scalloped edge punch by Stampin' Up; circle punch by EK Success.


Supplies: Cardstock by Bazzil, patterned paper by American Crafts (from the Merrymint Collection); snowflake stamp by Stampin' Up; embossing powder by Whisper; edge punch by EK Success; ribbon from craft supply.

Have a SAFE and HAPPY holiday!

Cheers,
Shannon

Wednesday, December 23, 2009

Inspired by... Sketch #1

I saw this sketch a while ago on http://www.iheart2stamp.com and fell in love with it. It's got a nice modern style and I love layering paper.


I created a few cards using this sketch as inspiration.  I thought it was time I put a dent in my stash of October Afternoon paper- OA is one of my favourite companies and I'm always hesitant to cut into it!


This first card is from the Farm Fresh line.


These next two were made with the Night Light collection. I love this line; I don't have kids (and truth be told, don't really like kids...) but the papers intended for little boys just slay me. They're so adorable!


I also made cards with the Road Map collection and the Weathervane collection. I think Weathervane is still my favourite October Afternoon line ever.


The kraft cardstock and the inks (Close to Cocoa, Chocolate Chip, Night of Navy) are from Stampin' Up. All other supplies (patterned paper, wild cards, rub-ons) are from October Afternoon.

If you create anything from this sketch, I'd love to see it- leave a link in the comments!

Cheers,
Shannon